Coloring Protein Surfaces in Blender
24 Aug 2017
As I start my PhD and get back into biochemistry, I’m also getting back into animation. Animation is a great way to visual how proteins function because proteins are three dimensional molecules that interact in three dimensions. UCSF Chimera is an excellent tool for viwing protein structures and is capable of producing animations. However, if you’ve ever seen the Inner Life of a Cell video, you’ll probably want to go for software that is more geared towards animation. My software of choice is Blender. Chimera is probably sufficient for the vast majority of small, simple animations, but you’ll definitely want to make a switch over to Blender if you plan on making a more complicated animation.
One of the hurdles I ran into as I got started with Chimera and Blender was how to get a protein surface into Blender and keep the color information. This isn’t a problem if the protein molecule is going to be a single color, but if you want to show any sort of surface coloring such as hydrophobicity or electrostatic potential, you need to be sure to export that information from Chimera and be able to use it in Blender. Fortunately, the process is quite simple.
For this example, I am using the Scorpion toxin BJXTR-IT protein structure from PDB. Your first order of business will be to download the .pdb file and open it in Chimera.
Once I opened my structure in Chimera, I went to the Actions menu and hid the ribbon structure because I want to show the protein surface. Technically you can leave the ribbon structure because it will be hidden under the surface, but when you import the file into Blender you are going to end up with both the ribbon and the surface. After hiding the ribbon structure, I went back to the Actions menu and showed the surface.
You can color your protein surface however you desire, but for this example I am going to go to the Tools menu and select Coulombic Surface Coloring from the Surface/Binding Analysis submenu. The Coulombic surface coloring will color your protein surface according to its electrostatic potential. There are more accurate tools for doing this, but this option does a pretty good job and is quick and easy to use.
Now that I’ve colored my protein surface, I am going to open up the File menu and then select the Export Scene option. Choose a filename and location and then select X3D as the filetype. Click on save and then go ahead and open up Blender.
Once you are in Blender, go ahead and delete the cube from the default scene. I’m going to go ahead and leave the camera and lamp. Now go to File, Import, and then select X3D Extensible 3D and then find the file you just saved from Chimera. This will import a rather large protein surface and possibly some lights. Go ahead and delete the extra lights, scale down your protein, and select smooth shading. My protein’s origin is also offset so I also set the geometry to origin.
Go ahead and give your scene a quick render. If you don’t see any color on the protein surface, not to worry, we are now going to take care of that. The process is a little different depending on if you’re using the internal renderer or Cycles, so I’ll cover both.
Blender Internal
If you plan on using the internal renderer, open up the Materials for your protein. Go down to the options and make sure the “Vertex Color Paint” option is checked. Now re-render your protein and you should see some color!
Cycles
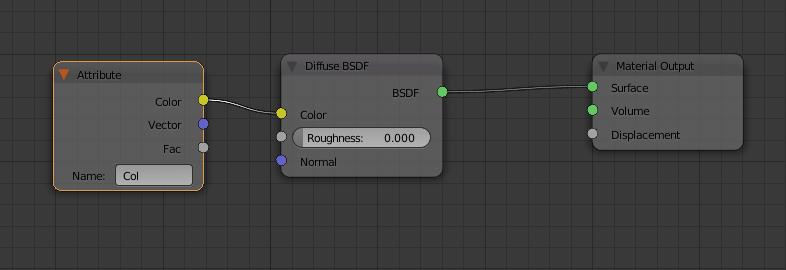
If you plan on using Cycles, open up the Node editor and create a node for your protein’s material. Create a new node and select “Attribute” from the Input submenu. In the name of the Attribute node put “Col” and connect its color to the color of the material node you are using. Give things a render to make sure the colors are showing up and you are good to go!
Go ahead and setup your scene how you’d like and make something cool!